Tag Archives: maintenance

Westerbeak Marine Generator

How to Change the Oil in a Marine Generator in a Vessel With an Electric Oil Change System – by Ryan

On a vessel, everybody needs to know how to do everything. If one member of the crew is not there to take care of something, another person must be able to complete the task. On most boats, electricity comes from the generator and it runs on fuel. To keep running the generator requires its oil to be changed every one hundred running hours. This process is not as easy as just buying some oil and filling a tank, but needs an assortment of supplies and it takes many steps to complete this job. First, you must gather the appropriate supplies. This includes:

  • Motor oil of proper viscosity,
  • 5 gallon bucket,
  • Funnel,
  • New generator filter,
  • Garden hose,
  • Paper towels; and
  • 1 ½″ thick 3′ long rubber hose.

Before you start, it is a good idea to have paper towels, or special oil absorbent cloths, set aside to wipe down spilled oil or to clean the area that you are working in.

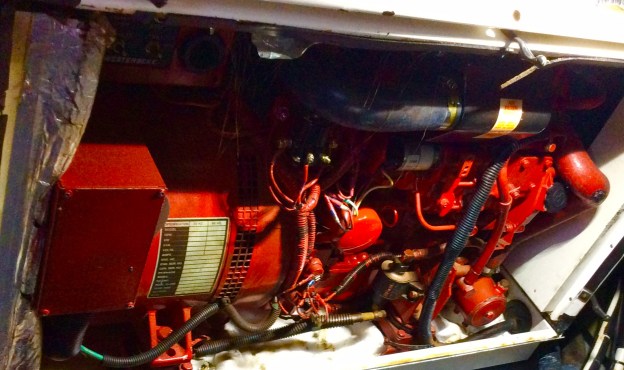
Once in the engine room, open the generator selector valve and attach the rubber hose to the pump discharge fitting. Place the 5 gallon bucket at the end of the rubber hose that is not being used. Flip the pump switch to drain position and pump the dirty oil into the bucket.

Ryan pumping the old fuel out of the generator

Ryan pumping the old oil out of the generator.

Next, disconnect the oil hose pump, wipe off any residual oil, and stow it away.

Ryan disconnecting the oil pump hose

Ryan disconnecting the oil pump hose

Coil the hose, wipe it clean & put stow it away

Coil the hose, wipe it clean & stow it away

Stowing the hose away

Stowing the hose away

Next, locate and unscrew the old oil filter. Clean the threads of the oil filter with paper towels, and securely dispose of any residual oil in the old oil filter.

Ryan pointing to the old oil filter

Ryan pointing to the old oil filter

Remove the old oil filter

Remove the old oil filter

Drain oil out of old oil filter into secure receptacle

Drain oil out of old oil filter into secure receptacle

Securely dispose of old oil filter

Securely dispose of old oil filter

Before installing the new oil filter wipe clean oil on the O-ring of it.

Dip finger in oil to lube ring of new oil filter

Dip finger in oil to lube ring of new oil filter

Lube outer ring of new filter with clean oil

Lube outer ring of new filter with clean oil

After wiping clean oil on the new filter, screw it in where the old oil filter was and hand tighten.

Secure new oil filter. Tighten with hand grip.

Secure new oil filter. Tighten with hand grip.

Next, disconnect the rubber hose from the pump discharge fitting. Pop the cap off where the oil is to be inserted into the generator and insert a funnel.

With funnel securely in oil input valve, pour in new diesel oil

With funnel securely in oil input valve, pour in new diesel oil

Carefully, pick up the five quart container with clean oil and pour approximately 4 quarts through the funnel. Be sure to pour it slowly or it will overflow over the funnel making a mess.

With funnel secure in oil input valve, add Diesel Oil

With funnel secure in oil input valve, add Diesel Oil

After adding approximately four (4) quarts of oil, take out the dip stick to check its level.

Ryan checking the dip stick oil level

Ryan checking the dip stick oil level

If the dip stick does not reflect the amount of oil inserted into the generator, you should probably check for a leak or other malfunction that could cause this. If the dip stick indicates it needs more oil, then  poor one more quart of oil through funnel before placing the cap back on.

Add another quart of oil

Add another quart of oil

Since this is a messy job, now would be the time to wipe down any spilled oil with paper towels, or oil absorbent cloths and to securely dispose of all of the garbage from this project.

Use oil absorbent cloth to clean any drips and spills

Use oil absorbent cloth to clean any drips and spills

Cleaning the engine room bilge

Cleaning the engine room bilge

It is also helpful to spray down the engine room with a garden hose to further clean up the mess. Once everything is closed back up, you should run the generator with no load to check for leaks. If there are not any leaks seal up the generator cover.

Close up and secure sound shield covering on generator

Close up and secure sound shield covering on generator

Secure sound and fire proof generator shield

Secure sound and fire proof generator shield

Finally, so you know when to change the oil next, log the generator’s hours in your captain’s log.

Improvise, adapt and overcome! (by Randy)

Vessel Vanguard

Vessel Vanguard

GENERAL MAINTENANCE

We have been utilizing our boat as our floating home for over a year now. In addition to living aboard her, we have travelled approximately 3600 nautical miles since we left Florida. One of the constant and ongoing requirements for an active vessel at sea is a rigorous maintenance program. We have been utilizing the Vessel Vanguard program to track our ongoing maintenance and it has proven very helpful. We have access to an interactive website that follows all of the routine maintenance schedules for the Pilots’ Discretion. It provides us alerts to upcoming maintenance as well as maintaining a parts inventory and equipment utilization records for all of the various systems aboard. We have tried to be very proactive in anticipating the potential for equipment failure and it’s implications for our operational readiness.

Despite our diligent attention to the Pilots’ Discretion maintenance, occasionally we are confronted with an unanticipated requirement for technical support. Usually, it turns out that we need to find a part in an out of the way spot or get a second opinion on some minor equipment malfunction. A couple of days later we are on our way with the offending system back on line.

DINGHY ISSUES

During our passage from St. Kitts to Antigua, we encountered a potentially catastrophic failure with our dinghy. We took the dinghy to shore in Majors Bay, St. Kitts for Patton’s morning walk and I noticed that the fuel gauge moved very quickly from full to nearly empty in the course of 20 minutes (we had just fueled the dinghy). In addition, the smell of gasoline was extremely strong and upon inspection, the bilge had two inches of raw gasoline floating in it. Anyone with any boating experience knows that gasoline in the bilge creates a very hazardous and potentially explosive situation. I checked all of the fuel lines throughout the boat and motor and could find no leaks. We elected to drain the bilge, clean it out as best we could and bring the dinghy aboard, not to be run again until we found some competent help to track down and repair our mysterious fuel leak.

Ryan, Randy & Patton securing the dinghy in Majors Bay, St. Kitts

Ryan, Randy & Patton securing the dinghy in Majors Bay, St. Kitts

We communicated with our cruising friends,  John and Paulette Lee aboard M/V Seamantha (via our Delorme satellite communications system) and they volunteered to do some online research regarding options for us for our arrival in Antigua. Before we had Antigua on the radar,  John had gotten back to us with the recommendation that we contact the folks at Seagull Inflatables (www.seagullinflatables.com) in Falmouth Harbor, Antigua.


Seagull Inflatables, Falmouth Harbor, Antigua

Seagull Inflatables, Falmouth Harbor, Antigua

As soon as we had the Pilots’ Discretion safely secured at Nelson’s Dockyard, I reached out to Seagull Inflatables owner, Mr. Dino Bruschi, and explained our issue. Dino told me he would be at our boat within an hour to evaluate and advise. True to his word, Dino was onboard Pilots’ Discretion and hard at work evaluating our fuel leak within the hour. The bad news was that he felt the integral aluminum fuel tank had failed. Ordinarily, that would not be a big deal but the engineering drawings of our dinghy showed that the tank had been put in place with no access points for maintenance. In fact, the tank had been installed and then fiber glassed in place. The net result to us was that the only way to access the tank was to literally cut it out of the boat. This was going to be major surgery for our dinghy with it’s still shiny new 40hp Yamaha outboard. I was having visions of the entire thing ending up on a scrap heap in Antigua. To his credit, Dino was not quite as pessimistic as I was. He assured me that he had a first rate shop and could complete the repair in a fashion that would meet our requirements and our budget.

The gas tank was sealed beneath the fiber glass & had to be cut out

The gas tank was sealed beneath the fiber glass & had to be cut out

Once the suspect fuel tank was removed, we found the source of our mysterious fuel leak. The fuel tank had been part of the boats electrical bonding system (a robust bonding system prevents a condition known as galvanic corrosion, a form of corrosion of metals that can present itself in the marine environment anytime salt water and electrical current are present) Somewhere along the way, the bonding strap that was attached to the fuel tank broke off.

The bonding strap on the fuel tank was missing which caused galvanic corrosion to occur

The bonding strap on the fuel tank was missing which caused galvanic corrosion to occur

Once that occurred, it was just a matter of time before galvanic corrosion would take its toll on the aluminum tank.

A tiny little hole in your gas tank can really ruin your day!

A tiny little hole in your gas tank can really ruin your day!

We found the corrosion holes, replaced the tank and installed a more robust bonding attachment to the new tank. After all of this, the magicians at Seagull Inflatables still had to reconstruct our tender in a way that was both cosmetically flawless and resulted in a stronger boat than we had arrived with. Throughout the process, Dino was diligent about communicating with me 3 or 4 times a day to make sure that I had the opportunity to participate fully in the development and implementation of the repair. Our dinghy is once again operational and if I do not show you the improved structure around the fuel tank, you would not be able to tell that there had ever been a problem. We cannot say enough good things about the way the folks at Seagull Inflatables go about their business. Thank you Dino and crew for an outstanding repair on short notice. For any fellow cruisers that require any attention to their tender or safety equipment while in Antigua, we would urge you to contact the folks at Seagull Inflatables. Dino can be reached on his cell at 1 (268) 725-4466. Thanks again Dino for a first rate repair.

Randy polishing the dinghy

Randy polishing the dinghy